Every year Apple organizes a WWDC for the developers and companies that are into iOS development. The main highlight of the event was iOS 12. This year the meet was more of a software-focused where CEO Tim Cook & his staff talked about macOS 10.14 Mojave, watchOS 5 and tvOS 12. Surprisingly this year there was no point discussed on hardware where as last year they did give a glimpse of HomePod, iPad Pro 12.9 and iPad Pro 10.5.
After Google Extended I/O all the developers, mobile app companies and tech savvy people have been waiting for the Apple WWDC 2018. There was a lot answering to be done by Apple software specially for the annoying iOS 11 problems. There was no wow factor about the WWDC 2018, attendees found it underwhelming. But developers definitely got an idea of what they all will be working on in 2018. This will allow them to plan and can also download iOS 12 developer beta too.
They confirmed iOS 12 and ARKit 2.0. For the first time viewers could sneak-peek into the iOS 12 features.There are many changes in the iOS 12 that people have been waiting for. Let’s take a closer look at some of the features of iOS 12 and ARKit 2.0.
iOS Performance :
iOS 12 can be seen with an alluring home screen that has been redesigned along with some changes made to the main apps like Mail & Camera. It has also said the the keyboard on iPhone 6S Plus will now be 50% faster, the camera will be able to click 70% faster. Though there were some disappointments as iOS12 has nothing interesting yet.
ARKit 2.0 Highlights :
Where as ARKit 2.0 had some interesting features to share. AR & Apple’s ARKit development platform had been showcased, where Apple is teaming with Pixar to build a new format to allow users to share the AR content.
Boasting the advantages of the digital & physical worlds merging in a new app called Measure. This allows users to use AR to see the size of the item by just dragging their finger through the item when you point your camera to it. Examples they showed were of a suitcase and photo frame.
Photo Apps Got Better :
The Photo App got better with a new search feature. It also has a “For You” tab that suggests what could possibly be done with images you saved.
Siri is more smarter :
Siri’s update was long time due, they added a new feature ‘Shortcuts’ that integrates with app to create amazing voice commands. One example was Tile Bluetooth Tracker that lets you create a command “find my keys” to activate the tile app locator.
Facetime Group Calling :
All this time we have been having group video-calls with 3-4 people, but the new Face Time allows you to have a group call with 32 people at a time. Yes, you read the right! You can choose who will take centre stage and lot more features are there in it. Just wait to experience this.
There were a lot more updates discussed like Stocks, New Books, Voice Memos, Do Not Disturb & Grouped Notification.
9series is a prominent mobile & website development company that believes in delivering only services and solutions to customers across the globe. They have always been at the front to add and adapt the innovations in the technologies. And our developers have the skills to create exceptional and customised iOS applications. We have the experience and expertise to develop iOS in all versions like Swift. We are ready to adapt and work on the new updates with the more zeal.
Stay tuned for more updates!
Resources : https://cdn.mos.cms.futurecdn.net/RdxhPVv8fAyM6oHsRgF6dH-650-80.png https://cdn.mos.cms.futurecdn.net/4tbGCxGUGsH9VwSLsfMDK5-650-80.png https://cdn.mos.cms.futurecdn.net/YVDTPs5vQJZ93TKABvKveC-650-80.png https://cdn.mos.cms.futurecdn.net/HgHRdKb3Mzj5neQ5REK7ZS-650-80.png https://cdn.mos.cms.futurecdn.net/4zEkFcsYHGYXtRGcm9E65F-650-80.png
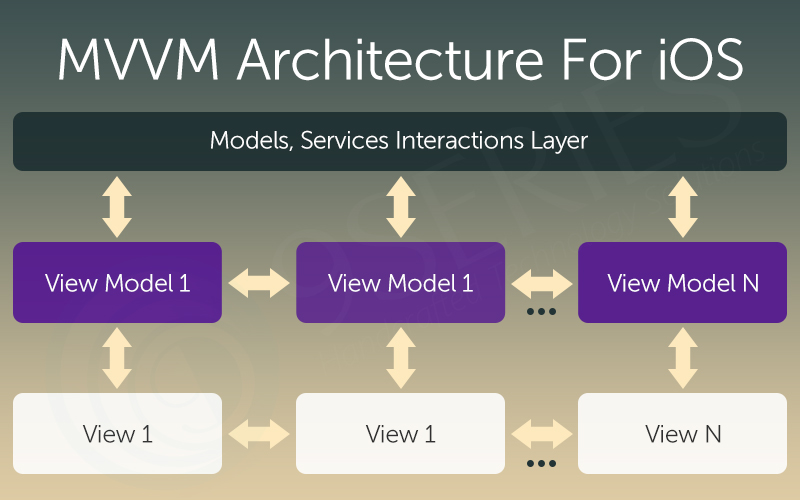
1. Introduction:
MVVM is an abbreviation of Model View ViewModel. A Model-View-ViewModel is software architectural pattern that was created way back in 2005 by John Gossman. MVVM is quite similar to MVC, but it provides better connect of the UI and business sense than that of MVC. In MVVM pattern, each view on the screen will be backed by a view model and it represents the data for the view.
2. MVVM flow Layout & Theoretical Background:
In an MVC-based project, View is Connecting with its ViewController. ViewController is easily overloaded and increases its size when the application becomes bigger. So ViewController is affected in MVC. This drawback Solution in MVVM pattern.
MVVM Data flow shown in Below Fig 1.
As per above figure, the three core components of MVVM model respectively are,
1. As per above figure, the three core components of MVVM model respectively are,
2. Model: it is class that holds our App Data.
3. View/ViewController: it presents our View and ViewController Class.
4. ViewModel: ViewModel binds the Model and ViewController, it’s the heart of MVVM design pattern. It provides the connection between the model class and the view/view controller. View Model is capable of observing changes in Model and synchronize itself with the events.
Example:
Let’s start Understanding MVVM Design pattern with a simple example.
First, create a project in Xcode. Also, create Model and ViewModel Class. In this project, we have taken tableView and shown employee name and its department using MVVM design pattern.
Model:
Shown model class in below Fig 2. In model class, we have defined variable and function, as per our requirement.
Fig. 2
View-Model:
- In View-Model Class we have taken a Model object, so we have used - Model class property in View- Model Class. In our project model Employee is a model object.
- Here Model and View-Model class are connecting to each other.
- Shown View-Model Class in Fig. 3
Fig. 3
View (Controller):
- First, take View-Model object in ViewController Class. myViewModel is View-Model object. In our project, we have taken table view.
- In this class, View-Model and View-Controller are connecting to each other. View-model object through, we get all data of View-Model class as per requirement.
- View (Controller) class shown in Fig. 4.
Fig. 4
Also shown Output in fig. 5
Fig. 5
Advantages:
- Code reuse: In View-Model class we implement init, setup and view presentation method, so we use this functionality in each new view controller.
- Improved Testability: In MVVM we can make all classes separate so we can easily find an error.
- Reduce code size
Disadvantages:
- MVVM pattern not useful for single View application, when we work on Multiple views then it is useful.
Conclusion:
MVC and MVVM both patterns are useful for iOS app development. MVVM is new Concept for the design pattern. MVVM is more useful when app size is bigger because the separation of Model, View and View-Model class can reduce complexity.
As we all know that Apple has introduced an API for natural language processing from iOS 5, which allows us to tokenize text, detect the language and determine parts of speech.
Basically Natural Language Processing (NLP) is used to either predict your next word or suggest a correction while typing a word. NLP is likely used in Siri.
The main API is NSLinguisticTagger which is used in analyzing and tagging text, segmenting content into paragraphs, sentences, and words. In iOS 11, NSLinguisticTagger becomes more powerful. It is used for following schemes,
Let’s take experiment with the new NLP API. At first, we need to do is create a tagger. In NLP, a tagger can read the text and give different information to it such as part of speech, recognize names and languages, perform lemmatization etc.
When you initialize NSLinguisticTagger, you have to pass in the tagSchemes in which you want to perform. Let’s do it:
1. Language Identification
You can retrieve this language by accessing the dominantLanguage property of the NSLinguisticTagger. NSLinguisticTagger analyzes the text to get the dominant language.
2. Tokenization
The punctuations and whitespaces are omitted with NSLinguisticTagger Options. Tokenization is the process of classifying the text into paragraphs, sentences, and words. We call them tagger.enumerateTags function to tokenize.
It will be splitting the above string into words and then we get the list of each word that is there in the sentence.
3. Lemmatization
Deriving the dictionary form of the word is called Lemmatization. For example, a user wants the result for word ‘run’. if you were able to consider base forms of the word, you would be able to also get results for ‘running’, ‘ran’, ‘will run’, etc.
Here the raw value of the tag is lemma of a particular word. So In output we got is stem form of each word token.
4. Parts of Speech
This is used to get each token’s lexical class. It will return each word and its part of speech. You can see the noun, preposition, verb, adjective, or determiner.
In the output, You can see the verbs, nouns, prepositions, adjectives, etc.
5. Named Entity Recognition
Named Entity Recognition is allowing you to recognize any names, organizations, or places. You would have seen certain keywords highlighted like numbers, names when you use some iPhone application.
In the following example we identify whether the token is named entity like personal name and place name.
Here we have used tag variable which is used by tagger to look for particular tags in sentence.
Conclusion
Natural Language Processing is already a powerful tool, growing exponentially and that can be widely used in the Applications. Apple’s Siri and Facebook’s messenger bots are the best examples of NLP.
In this article, we, 9series, have covered about NLP, its terms and how it works. If you have more experience with it or find more features then feel free to share your own experience with us.
Stay tuned for upcoming articles.
As we all know following a procedure can be very boring, hectic and time-consuming in the development process. Most of the developers working in an iPhone app development company in India have the tendency to jump directly into the coding because of all the effects and fun there.
According to our experience in application development, it is very helpful to follow some practices before jumping into the coding part. It always helps in reducing complexity, increasing the readability, easier to maintain, avoiding redundancy, etc. Also, it is helpful to other team members to understand the concept and the flow of the application if working in a team.
So, let us check and dig the topics one-by-one which will be helpful to create a proper architecture of the application and also be helpful for the entire team in the future.
1. Define Coding Style
Coding Style is the most important aspect that should be defined before you start writing any application, especially while working in a team.
It includes the below points:
2. Define Architecture for The Application
It is necessary to decide the architecture for the app before diving into the code. Choice of suitable architecture will make the app more testable, easier to understand and reduce its maintenance cost. You can choose any architecture from traditional MVC to recent or fancier MVVM. There are so many resources available on the web from which you can understand and decide architecture for the application. Below is some reference for the design pattern. https://www.raywenderlich.com/132662/mvc-in-ios-a-modern-approach
3. Setup Folder Structure
Instead of keeping all the files in a single directory, it is a good idea to follow some folder structure for the project. It will make the files well organized and easily findable, you can use the following:
Although this may look negligible at the first sight but for the big projects, it is certainly more helpful, well structured and easier to understand for every team member working in the project.
4. Manage Your Dependencies
It is very certain that everyone is using some third party libraries in their application. So for that, you should use one of the dependency managers from the ones that are already available. We usually prefer CocoaPods which has the vast collection of libraries and easy integration facilities, you can use any of below depending on the requirements.
5. Setup Certificates and Profiles for Code Signing
Most annoying and painful task of the application development is creating certificates and provisioning profile. This process includes creating application id (Unique identifier for the device), adding devices to developer account, creating certificates (development certificate for debug the application and distribution certificate for releasing the application.), creating provisioning profiles (same as certificates), also creating APNS certificates if your application is willing to get the push notifications from the server, providing .pem file to PHP developers or .p12 file to .NET developers.
6. Continuous Integration
This is very much advisable either working in a team or individual. This will keep track of your development process and at any point of time, you can check the updates for the particular date or time period. You can use either git or SVN whichever is suitable for you for the continuous integration. This will help all the team members to pull the latest updates done by the other member as well as push the new changes to the other team members. The main benefit of this is you will have all your code on the server and you will be able to access it from anywhere.
7. Setting Application Icon and Splash Screen
Though this is not a mandatory task and not that much important for the initial stage but setting it initially make your application first impression good. Application icon carries a variety of sizes of the single image so instead of forcing designer for all size images you can just ask of 1024*1024 size icon with some background and you will be able to get all the required size images from some online or online tools. Splash screen set up is also carry 2 ways either you set the launch images or you can use the launch screen for setting up the splash screen.
In this article, we have covered the major points about defining the iOS Application development Architecture. Though list can be expanded more with more topics like how code style should be applied, commenting guide, etc. You can also add your own topics, thoughts, etc. and feel free to share with us.
We hope that these tips will be helpful for you to define and start the application with the best style.
Happy Coding! and feel free to share your own experience on “[email protected]”.
Hello everyone, as we all know that Share Extension is appeared from iOS 8, then the capability to share content with other entities, such as social sharing websites or upload services can be done in an easy and convenient way.
We, 9series, an iOS application development company has started doing all the development using Advanced Programming Language Swift.
So today, we are going to build a Shared Extension app in iOS10 with Swift 3.0, an ability to show an icon on the common share-sheet that associates with our main app, which handles the sharing of the content that the user has requested. So the user can easily switch from one app to another, for example, we are sharing a photo from the album with some content that switches our app where we want to upload data to the server.
This is mainly a programming article, so you are required to have Xcode 8 on Mac. Let’s get started !!!
1. Make a new Xcode Project
First Create a cocoa touch Single View Application in Xcode 8 with some basic UI. Like it is shown below
Design the screen with UILabel, UIImageView, UITextView and with UIButton. When user comes with some sharable content from parent app, we can upload or we can use anywhere in our app.
For Eg, let’s create the Share Extension.
Give some proper name of that extension and it will show you popup view for activating your extension scheme. Choose Activate to use this scheme for building and debugging.
Note: Schemes can be chosen from the toolbar or Product menu.
3. Make an App Group
We want to communicate two app for sharing some content, but Apple doesn't want a complete free flow of data between the two. Apple recommends a shared NSUserDefaults as a meeting ground where the two app can exchange their data.
Now, we need to make an app group.
Click on your project in the Navigator Pane of Xcode, click on capabilities and your app under the target list turns on App Groups. Give it a name like “group.BUNDLE IDENTIFIER”.
Now click on your extension and do the same.
4. Implementing Share Extensions in Swift
First open your viewController, we won’t go into much detail, because it's a destination viewController. So we can read content data from User Defaults which is shared by user from Share ViewController.
We have also created an IBAction of Upload button, so that content and photo which is shared by user can be used anywhere in our app.
Here, “sharedIdentifier” is the UserDefaults suiteName that we have used for the app group name. An extensionContext where we get a list of NSExtensionItems. This is a fixed array of data sent to our extension from a parent app. We are getting photo and content from our photos app that are already set to our main app.
Let's look at the “ShareViewController” from our Shared Extension Folder which is subclass of SLComposeServiceViewController. SLComposeServiceViewController has some methods and properties associated with the lifecycle of a share-sheet composition view.
isContentValid() :- It is called every time when the content in the compose view changes. Here, we can check the input data is valid or not. It is called first, and will disable the post button when it evaluates to false.
didSelectPost() :- As the name suggests, it is called when the user presses the post button. Here we can do something with the user input. Once the upload is scheduled, you must call completeRequestReturningItems([], completionHandler:) so that the host app can un-block its UI. When the upload request is done, it calls the completion handler that was passed into the previous mentioned function call.
configurationItems() :- Here, we can add more things for the user to select when they are sharing. In our case we are sharing a photo with contentText. You can also make it more dynamic with some other controls.
contentText :- A string which represents what the user has typed into the composer.
charactersRemaining :- Is a number which appears on the compose sheet. When negative number shows, its appearance becomes red.
Here is the code of “ShareViewController”
Here, we are selecting one image from photo album and then clicking on share button, it will open share sheet with our Share Extension app Icon.
Select that app and it will open composition view.
We have mentioned maximum characters of contentText as 100, so if you enter more than 100 characters, than it will generate alert message and post button will be disabled. You can also check number of characters at the end of compose sheet.
Configuration! items is where we can add more things for the user selection, when they are sharing. Like, Open UITableViewController as subview Controller and selecting User Input it will display as item value at the bottom of compose sheet.
Configuration! items has title, value, and a tapHandler. So you can add extra functionality for selection from User.
ExtensionContext has list of attachment as NSExtensionItem. We’ll loop through the attachments, and look for one typed as an image. It will have the type identifier kUTTypeImage. NSItemProvider items are lazily loaded images, videos, URLs and so on. We’ll load it using “loadItemForTypeIdentifier”. This has a completion handler, where we’ll read the image from the URL, and then we’ll save it to defaults.
After pressing Post Button, It will save Image in UserDefaults with “Image” key, and contentText with “Name” key.
We have created two utility methods for saving data to user defaults and for alert message.
Till now, Apple wouldn’t accept this in their app store. We need to tell iOS when to show our share extension, and what can be selected. Otherwise when we compile we’ll get a warning.
“Warning: Embedded binary’s NSExtensionActivationRule is TRUE PREDICATE”
So for that, open the “info.plist” as source code by right clicking on it. We’re going to change the NSExtensionAttributes section. This means our extension is activated only for images, and only when it’s a single image. If you select more than one image, the extension app automatically hides from share-sheet.
You can change your display name of your app in share sheet by replacing the code in the “info.plist” of your Extension.
5. Test Your Share Extension
1. First you have to simply run your app.
2. Then run your Share Extension.
3. When suggested to choose an app to run, choose Photos.
4. Once the extension starts running, select a photo and tap on the Share button.
5. On the first run, you will need to add your extension to the share sheet.
6. Click on the More button to the right of the other share icons and turn on the switch for your extension & then select Done.
7. Now you will be able to see your extension icon in share - sheet.
8. Select an individual photo and click on share. By selecting your app, add some content and press post button.
The image will be saved to your main app. To confirm this, redirect to your app. You can check the content you entered in the textview and the image above the content.
In this article, our best iOS application developers in India, have only covered some basic UI. You can also make it more dynamic with other controls.
Hopefully, all of this will help you share data with your parent app.
Happy Coding! and feel free to share your own experience on “[email protected]”.
Hey, welcome back!!! Let’s move one step ahead with the open source development language from Swift 3 to Swift 4. We, at 9series, have filtered out points of our next strides in developing mobile apps using Swift 4.
Swift 4 is the latest major release for iOS App Developer that is intended to be completed in the fall of 2017. Its main focus is to provide source compatibility with Swift 3 code while implementing essential feature work that needs to achieve binary stability in the language. It will contain valuable enhancements to the core language and Standard Library, particularly in the generics system and an overhaul of the String type.
Source Compatibility Modes
The Swift 4 compiler will provide two language modes: Swift version 3 and Swift version 4. Swift 3 established the language for source-level stability and now Swift 4 releases source compatibility as a feature moving ahead.
New Features in Swift 4
Swift has many other features to make your code more expressive:
Multi-Line String Literals
To start a string literal, you need to write three double quotation marks: """ then press return. After pressing return key, start writing strings with any variables, line breaks and double quotes. To end multi line string literal again write ””” in new line. Ex:-
Strings are Collections
Just like in earlier version of Swift, Strings can be handled as a collection. No need to write string.characters.something to perform string manipulation.
Dictionary Functionality has Improved
Swift 4 combines some additional functionality to dictionaries to make them more strong, and also to make them work more like you would expect. Let's start with a simple example: Modifying dictionaries in Swift 3 does not return a new dictionary. Instead, it returns an array of tuples with key/value labels.
After that code runs you can't read distinction["Maths"] because it is no longer a dictionary. Instead, you need to use distinction[0].value, which is not good for us because we apply filter on dictionary and we got an array.
As of Swift 4, this acts more like you would expect: you get back a latest dictionary. Obviously this will break any existing code that relies on the array return type.
Similarly, the map() method on dictionaries got a key-value tuple passed in, and could return a single value to be added to an array.
That has not changed in Swift 4, but there is a new method called mapValues(). It allows you to modify the values and place them back into a dictionary using the original keys.
Here we try to form different buckets where each bucket will contain values having same first character in their name. For Example:-.
It's now likely to obtain a dictionary key and provide a default value to use if the key is missing. In following statement if there is no value for key “Bio” found then it will print default value.
Built in Encoding and Decoding
Swift 4 appears with built-in encoders and decoders for JSON. JSON to Model conversion comes in built in.
One Sided Range
Swift 4 introduces Python-like one-sided collection slicing, where the missing side is automatically assumed to be the start or end of the collection.
Conclusion
Like with other Swift releases, 4.0 was announced at WWDC '17 and released in beta form for developers alongside Xcode 9. This release of Swift added quite a few refinements and features to the programming language. First release of Swift 4.0 will bring overall stability to the source and binary interface, or ABI.
Stay tuned for other technical and development articles.
Eagerly waiting for the features of Xcode 9? Here it is. Apple has released Xcode 9, the newest version of its free integrated development environment (IDE) for building iOS application, macOS, watchOS, and tvOS apps.
With everything you need to create amazing apps for Apple platforms, Xcode 9 is unbelievably quick and consistently smooth while editing even the largest files. It also understands your code better than ever. Powerful new refactoring tasks happen in place, renaming symbols across Swift, Objective-C, and even user interface files without skipping a beat. And with source compatibility in Swift 4, Xcode 9 uses the same compiler to build existing Swift 3 code and updated Swift 4 code, so you can migrate at your own pace.
Brief About Xcode 9
All New Editor
Xcode 9 has a brand new Source Editor, entirely written in Swift. In the new editor you can use the Fix interface to fix multiple issues at once. Also, when mousing around your projects, you can hold the Command key and visually see how structures in your code are organized.
The source code editor has been completely rebuilt for amazing speed. It scrolls at a constantly smooth rate, no matter the files size. And it looks better, too, with preferences that give you greater control over line spacing, multiple font styles, and even the type of cursor. Issues have been redesigned to flow nicely with your code with Fix-its that are grouped together so you can commit multiple changes in a single click.
You can now increase and decrease the source editor font using ⌘ with + and ⌘ with -. When text is selected, typing an opening delimiter adds a matching closing delimiter at the end of the selection.
Refactor and Transform
The new editor goes beyond text entry with a new built-in refactoring and transformation engine. When you select a symbol or block of code, the editor will offer powerful operations such as ‘Extract’ or ‘Rename.’
One of the most basic refactorings is to rename a class, and all references to that class in the project are renamed as well, including references in the Storyboard and the filename itself.
Xcode 9 supports the following transformations and refactorings:
Project Navigator
Groups in the Project Navigator are now more closely associated with directories in the file system.
Source Control and GitHub
Xcode 9 now connects easily with your GitHub account making it very easy to see a list of your existing projects, clone projects, manage branches, use tags, and work with remotes.
With your GitHub account built into Xcode, the clone window shows all of your personal GitHub repositories, as well as all the repositories where you added a star. From this window, you can search all of GitHub and check out a project with just a click.
Swift 4
Debugging
Faster
A new indexing engine runs as part of the build process, so Xcode understands your code automatically.
Searching large projects feels quick – up to 50 times faster. And a new build system dramatically lowers the overhead of tasks that coordinates compiler, linker, and other tools.
Simulators
Conclusion
With Xcode 9 and Xcode Server, we have almost everything in single place used to create apps for Apple TV, Apple Watch, iPad, iPhone, and Mac. As we know and experienced that no softwares can be complete or can be in a finished version, there are many new great features included in this version of Xcode. So we should definitely go for it and experience it.
We, as a mobile app developer believe that using Xcode 9, development can be done faster and can be pushed ahead with the next strides.
In this article, we, 9series, have covered about what is new in Xcode 9. If you find any new features or might have experienced with existing one then feel free to share your own experience with us.
The 2017 Worldwide Developers Conference keynote was Apple's biggest event in years, with the company introducing both new software platforms and a range of new hardware products.
As usual, the event began with the message for developers “Keep making apps, the world is depending on you”.
And as always, the event started with a keynote during which Apple announced dates (June 5–9, 2017 in San Jose) of updates for their iOS, OS X, watchOS, and tvOS platforms.
iOS 11
A Giant step for iPhone, A Monumental leap for iPad
Apple officially announced iOS 11 at WWDC 2017. The next major update to the operating system running on millions of iPhones and iPads will improve.
Messages App Syncs Across Multiple Devices
The first new iOS 11 feature: synchronized conversations across iCloud, iOS, and macOS. Messages are moving to iCloud.
If you erase a message on your iPhone or iPad, then it will also delete from the iPad and the Mac and vice-versa. Our conversations will be stored on iCloud, which will make them easier to retrieve your future Apple devices.
Apple Pay
There is also an update related to Apple Pay, which will now be able to pay people. Person-to-person payments let people pay directly from Messages as an iMessage app.
It uses the TouchID fingerprint sensor. And the money which received will go into your Apple Pay Cash Card, which you can use for further Apple Pay payments, or to transfer money back into your account.
It might be helpful to make payment through application and person can directly transfer money to his friends or family members or use as general. Hence, we can enhance our application to the next level in terms of eCommerce market.
SIRI
Aha, Apple has made improvements to Siri that makes assistant’s voice sound more natural when responding to users. Siri will now be able to perform translations from English to Chinese, French, German, Italian, or Spanish. Wow…
As a ios developers, we can definitely use this feature into multi-language application and give better user-interface as well as performance to our app users.
Siri is also getting smarter about suggestions. On-device, learning is synced across other Apple devices but kept completely private, readable only for you. Siri gives suggestions based on personal usage of Safari, News, Mail, Messages and more. For example, as Siri learns topics or places, a user is interested in while browsing Safari.
Camera
The camera also has lots of improvements, including improved image quality. Portrait Mode in the iPhone 7 Plus can be taken with Optical Image Stabilisation, True Tone flash and HDR.
Apple has also added a new technology called High Efficiency Image File Format (HEIF) that reduces the file size of your iPhone 7 or 7 Plus photos.
This can be helpful into the application where Image and its quality is considered as the core concept.
CONTROL CENTER
In iOS 11, Apple has redesigned Control Center, which is the thing that users can swipe up to access frequent and important settings or change songs when listening to music.
Drag And Drop For IPAD
Apple is specially focusing on productivity for the iPad with iOS 11.
A new drag-and-drop feature lets you quickly move info or media from one split-screen app into the other besides it. Drag and drop can also be used with apps on your dock or home screen.
Lock Screen Improvement
The Lock Screen in iOS 11 has been improved so that you can see all of your Notifications in one place.
You can see all of your Notifications, simply pull it down from the top of the screen. Then you will be able to see both your recent and missed notifications in one place.
Here, we should take care about sending an extra unnecessary notifications, as our users can’t get bored from such things. And only useful notifications should be seen to attract the user of our application.
Maps App
Apple announced that the Maps app in iOS 11 will support indoor mall and airport maps. The indoor maps will allow you to see which restaurants are past security at the airport. And you can also see which stores are on what levels in the malls.
Lane Guidance in Maps now encourages you to dodge missing a turn or an exit by showing which lane you should be in when you’re navigating. You can also check the speed limit of the road.
As a mobile app developer, we should think that whether this feature can put our application into an advanced level in terms of event organization kind of feature where our users can easily find the place/stall where he needs to go.
Do Not Disturb While Driving
Apple iOS 11 has a very useful safety called Do Not Disturb while Driving. This feature helps drivers stay focused on the road by automatically silencing notifications. And you can send auto-replies to your contacts in your favorites so that they know you are driving.
App Store App Improvements: A whole new design, A whole new perspective
The App Store has been redesigned from the ground to help you discover new apps and games you can’t live without. You’ll see daily stories by experts, a dedicated Games tab, lists for all kinds of apps, and much more. It’s the biggest thing to come to the App Store since apps. And now apps that are submitted to the Apple App Store are generally reviewed within 24 hours.
ARKIT
Apple is building augmented reality directly into the core of iOS, giving developers the tools they need to convincingly blend digital entertainment with the real world. So with help of this new framework, we can effectively introduce augmented reality into our application.
Now, it’s like behind-the-scenes stuff for iOS. It’s getting Metal 2, of course, and a new set of machine learning APIs letting developers use Apple’s natural language comprehension and facial recognition tools.
macOS High Sierra
Your Mac. Elevated
macOS High Sierra introduces new core technologies that improve the most important functions of your Mac. From re-architecting, it shows how it stores your data & how you watch videos to unleash the full power of the graphics processors.
Apple File System
To your Mac, everything you care about is data. And a file system is what organizes all that data into files and folders you can access with a click. Apple’s current file system was designed in the early days of Mac, and it has performed beautifully ever since. But today’s flash‑based Mac opens up new possibilities for innovation, so it’s time to lay a new foundation. With macOS High Sierra, Apple is introducing the Apple File System to Mac, with an advanced architecture that brings a new level of security and responsiveness.
Below are some bullet points about updates in macOS High Sierra:
watchOS 4
More intuitive, More intelligent, More you
Apple announced a new version of watchOS. One of the most noticeable changes in watchOS 4 is the option of using a Siri watch face. This automatically displays contextual information on the Apple Watch, such as approaching appointments, and traffic reports if the wearer is going to work.
New fitness feature includes in controls, more prompts to set goals, and two-way workout data exchange with certain gym equipment. The Apple Watch will also be able to better connect with other hardware gadgets, such as continuous glucose monitors and smart tennis rackets, via NFC. This can be a useful feature where our application also interact with Watch OS.
watchOS 4 also includes a new Music app meant to improve the AirPods experience. Multiple playlists can now be synced including Apple Music-recommended playlists.
The Dock on watchOS 4 has a new look with a vertically scrolling interface with can lead to the UI Interface of the watch application. watchOS 4 can also automatically start when workouts are started, and music playback controls are integrated with the Workout app.
Control Center gains a new flashlight function using the display which also works during outdoor, night workouts as a safety feature.
tvOS
In WWDC 2017, one thing to say from apple about tvOS, The Apple TV is getting a big new content, as Amazon Prime Video is coming to Apple TV and Apple’s new TV app.
New Macs and the iMac Pro
Now faster across the line
Apple also upgraded its MacBook and MacBook Pro lineup with faster processors and SSDs. It also refreshed the MacBooks.
Apple’s 13-inch MacBook Pro without the Touch Bar on top now comes with Intel core i5 processor clocked at 2.3GHz, 128GB Storage and 8GB RAM. This also has two Thunderbolts 3.0 ports.
iMac Pro: The most powerful Mac ever
The all-new iMac Pro, with its gorgeous 27-inch Retina 5K display, up to 18-core Xeon processors and up to 22 Teraflops of graphics computation, is the most powerful Mac ever made. iMac Pro packs incredible performance for advanced graphics editing, virtual reality content creation and real-time 3D rendering.
iPad Pro
Any you can do, you can do better
The new version of the iPad Pro has a 10.5-inch display, 20 percent larger than the previous 9.7-inch model. Apple said that It features a better display with richer color and a new feature called ProMotion, which updates its content up to 120 times per second making it feel smoother and more responsive.
HomePod: Apple’s new Siri speaker
The HomePod has seven tweeters and four-inch woofer; it has an A8 chip living inside it. That’s a feature Sonos has too, letting the speakers adjust their output to, say, push the vocals down the centre of the room while bouncing the bass off the wall.
A feature will respond to “Hey, Siri,” play from your Apple Music account, and answer questions about the music it’s playing. It will also handle other Siri queries, such as weather, news, messages, podcasts, stocks, controlling smart home devices via HomeKit, etc.
Conclusion
Above are the announced points of Apple during WWDC 2017. Though we haven’t had a chance to look through everything yet, feel free to post any missing points or share your thoughts about these new features in iOS app development.
Want to share something innovative about the new release? Feel free to write us at [email protected].
An app extension allows you to fabricate custom functionality and content ahead your iOS app and make it accessible to users while they’re interacting with other apps or the system.
App extensions give users access to your apple app development functionality and content throughout iOS and OS X. For example, your app can now appear as a widget on current screen, offer photo filters within the Photos app, add new buttons in the Action sheet, or display a new system-wide custom keyboard. Use extensions to place the power of your app wherever your users require it most.
1. Action Extension
Action extensions permit users to transform content arising in a host app without leaving the app. You can, for example, edit images, change the text format and change the content itself, etc. At WWDC 2014, Apple revealed a demo of an Action extension that translated the text of a web page to another language without leaving Safari.
When you build a new action extension, Xcode creates a template which when used without modifying its configurations, will arise in every single action sheet by default. It won’t show any checking of the content types to decide whether or not it’s suitable for the host app.
You can make two types of action extensions: one with a user interface and one without a user interface. If you prefer the latter one, it will be restricted to Safari, but if you provide a user interface, then the extension can be made available to other apps that show that the extension supports the type of content to be transformed.
2. Audio Unit Extension
An Audio Unit app extension provides users a suitable way to build or modify audio in any iOS or macOS app that uses sound, including music production apps such as Logic Pro X or GarageBand.
The Audio Units extension framework is basically an enhanced approach to use audio apps like effects and virtual instruments within audio host apps, like Apple’s own GarageBand or other audio editing and merging apps. With the help of Audio Units, Apple let's audio plug-ins show up as UI within another app, enhancing the workflow and making the experience much like what experts are used to on the Mac in apps like Logic Pro.
3. Broadcast Upload Extension & Broadcast UI Extension
ReplayKit was introduced in iOS 9 as an approach to give users a chance to record themselves using an app or game, then share it with friends. iOS 10 takes the entire process a step further by presenting live broadcasting of ReplayKit streams, and does so by developing on existing live streaming services: users install apps that support live streaming and ReplayKit lets you clasp into them.
So, let's say you want to stream somebody's game to a service like Twitch: you begin by creating a RPBroadcastActivityViewController to let the user select which streaming service they want to use. They will revert back a RPBroadcastController that can start, pause, and stop live broadcasts, and furthermore let you know whether broadcasting is currently happening through its isBroadcasting or not.
4. Call Directory Extension
Apps can build a Call Directory Extension to recognize and hinder incoming callers by their phone number.
Both recognizing and hindering of incoming calls is set up in the implementation of the beginRequest(with:) method of the CXCallDirectoryProvider subclass of Call Extension. This method is called only when the system launches the app extension.
When a phone accepts an incoming call, the system first advises the user’s contacts to locate a matching phone number. If no match is found, the system then advises your app’s Call Directory extension to locate a matching entry to recognize the phone number. This is beneficial for applications that keep up a contact list for a user that is detached from the system contacts, such as a social network, or for classifying incoming calls that may be initiated from inside the app, such as for customer service support or a delivery notification.
To provide recognizing information about incoming callers, you use the addIdentificationEntry(withNextSequentialPhoneNumber:label:) method in the implementation of beginRequest(with:).
5. Content Blocker Extension
In iOS, a Content Blocker extension personalizes the way Safari manages your content. The extension adapts your content by blocking loads, hiding elements and dismantle cookies from Safari requests.
Using a Content Blocker extension, you grant Safari with content-blocking rules that define how Safari treats content such as scripts, images, and pop-up windows. Your rules can cover Safari-downloaded content or keep Safari from requesting particular content from the server. By reducing the number of content Safari requests, your extension can decrease the amount of time required to load pages. When you obstruct content from loading, you decrease Safari’s memory usage and enhance Safari’s performance.
In addition to obstructing unwanted content, a Content Blocker extension protects privacy.
6. Custom Keyboard Extension
A keyboard extension switches the standard keyboard with a custom keyboard. Custom keyboards are enabled in the Settings app, under General > Keyboards. Once enabled, the keyboard is accessible amid text entry within any app, aside from when editing secure text fields and phone number fields. People can enable multiple custom keyboards, and shift between them at any time.
7. Document Provider Extension
The Document Provider extension permits an app to share its documents with other apps on a user’s device in a secure and timely manner. If you have ever used the Document Picker, you might have appreciated all the apps in the Locations section.
The Document Provider extension performs as the link between the files that your app handles and other apps on the user's devices. It lets different apps import or open the files, downloading and uploading them from your server as required. Apps can also export or move their documents into your extension’s shared repository.
The Document Provider extension comprises of two separate parts: the Document Picker View Controller extension and the File Provider extension.
8. iMessages Extension
These app extensions permit developers to add new functionality directly to the Messages app in iOS 10. Users will soon be able to play games, exchange money, send videos, or make restaurant reservations all within the context of their existing iMessage conversations. Mobile App Developers can now build their own different types of apps, that vary from sticker packs to fully interactive interfaces which generates inline iMessage content.
iMessage apps work similarly as extensions. If you already have an app and need to provide iMessage functionality, you won’t require making a whole new app. You can just plug in the iMessage functionality and submit to the App Store. There’s likewise going to be a mini version of the App Store, particularly for iMessage apps, incorporated right into the Messages app. The user will be able to browse all apps compatible with iMessage and install them – right at the spot.
Conclusion
These app extensions are incredible features in ios app development that apps should take advantage of. In this article we, as a mobile app developers, have emphasized some of the key extensions in app. And for further more app extensions, let’s get in touch with the upcoming article.
If you have any comments or questions, feel free to contact us on “[email protected]”.
Welcome to the next level of insights about WatchOS. If you are new to this WatchOS series then please read our blog Fundamental Concept of WatchOS.
In this article, we will look about data sharing methods across Apple Watch and iOS app. Also we will check for background tasks, Apple Pay Enhancement, WatchOS Connectivity framework, What’s new in WatchOS 3.0, etc.
So, let’s start with further more features and updates for WatchOS:
Different Methods of Sharing Data Between WatchKit and iOS App
What’s New in WatchOS 3.0
With the upcoming WatchOS 3 update to all Apple Watch devices, the performance of many watch applications is definitely going to improve. This is mainly due to the new forms of background execution where watchOS apps can take advantage in order to refresh their content periodically and always have the latest information that is ready to be viewed by the user.
1. Background Task
Background tasks give your app time to keep running out of sight and ensure that the information user needs is accessible before they open your app. WatchOS 3 introduces several types of background tasks:
Background App Refresh
Utilize the WKApplicationRefreshBackgroundTask class to update your app’s status in the background. You frequently use a background app refresh task to manage other tasks. For example, you might use a background app refresh task to start an NSURLSession background transfer or to schedule a background snapshot refresh task.
2. Apple Pay Enhancement
In WatchOS 3, the PassKit framework (PassKit.framework) includes support for in-app payments on Apple Watch. In-app payments enable users to securely provide payment and contact information to pay for physical goods and services.
3. Watch Connectivity Framework Enhancements
The WatchConnectivity framework introduced in WatchOS 2 and iOS 9 is likewise increasing some new functionality with WatchOS 3 and iOS 10.
If a user has placed your app's complexity on their watch face, then you can transfer data from the phone to the watch up to 50 times in a single day. But while transferring, if the data goes beyond the limit of 50, then the user will get notifications about the exceeded limit. This is done, as in iOS 9 and WatchOS 2, via the WCSession transferCurrentComplication(userInfo:) instance method. The new functionality in watchOS 3 and iOS 10 is the WCSession remainingComplicationUserInfoTransfers property, which will show you how many transfers are left for that day.
Another new WCSession property added is the hasContentPending property, which is just a boolean value signifying whether or not there is data yet to be transferred between the iPhone and Apple Watch.
4. Existing Frameworks now available in WatchOS
5. SnapShot and Dock
In WatchOS 3, app sights have been removed entirely from the Apple Watch and instead have been displaced by the dock, which provides a rapid way for users to view and launch their favorite apps. After pressing the side button to show the Dock, users scroll through it to view snapshots of their favorite apps. When users stop scrolling and let the Dock settle for a moment, the promoted app wakes and the snapshot gets replaced by the running app.
The system automatically takes periodic snapshots of your app and uses them to populate the Dock and to serve as your app’s launch image. You can modify both the currently presented interface controller & the controller’s content before the snapshot is taken.
6. Control Center
Provides support for all-new Control Center which can be invoked by sliding up from the bottom of the screen.
7. New Watch Faces
Adds new watch faces and adds support for switching between them by swiping left/right from the edge of the watch screen.
8. Activity/Workouts
Adds support for sharing an activity with friends using iMessage or other messaging platforms.
Adds support for tracking the progress of people in wheelchairs, showing a "Time to Roll" reminder rather than "Time to Walk" as watchOS 2 did. It is now conceivable to see 5 different workout metrics all at once. This includes distance, pace, active calories, heart rate, and elapsed time. Adds support for delaying a workout when halted at a stoplight. Support for another Breathe app guides users through a set of deep breaths to help them be more comfortable.
9. SOS
Adds support for a feature called SOS which allows a person to place emergency calls by holding the side button for 5 seconds.
Give us a chance to check with some convenient question-answers.
FAQ
1. How many Apple Watch can I pair with one iPhone?
2. What is the maximum size for WatchKit App?
3. Can I play video on Watch App?
4. Can I fetch contact in WatchKit app?
A debt of gratitude is in order for your opportunity to peruse this article and constantly running over our blog. We trust you appreciated next level of insights about Watch OS shared by our best iOS application developers in India. Stay tuned with us for more technical and advanced articles.
Feel free to share your queries, thoughts or focuses on “[email protected]”.